Nie ma nic bardziej denerwującego nad wodą niż chwile dobrych brań, kiedy trzeba błyskawicznie zrobić węzeł, a tu po raz kolejny nic z tego nie wychodzi. Wędkarzom muchowym raczej nie zdarzają się takie sytuacje – pod warunkiem, że opanowali sztukę wykonywania pętelek.
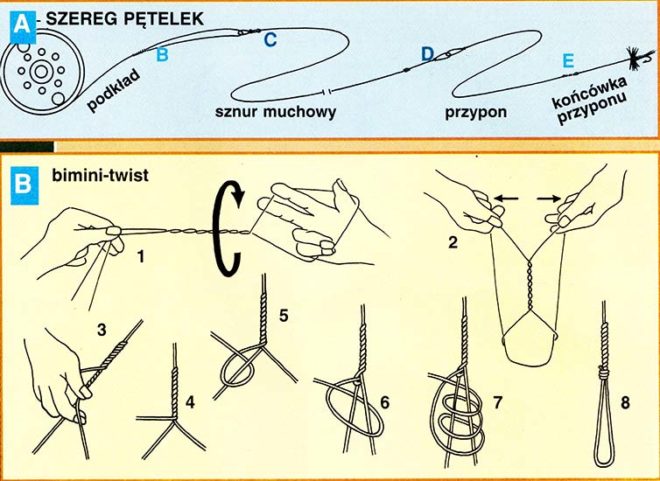
Czas rzeczywistego wędkowania jest bardzo cenny. Żmudne montowanie sprzętu nad wodą jest tylko niepotrzebną stratą czasu, bywa również bardzo denerwujące. Dzięki zmontowaniu sprzętu przed przystąpieniem do łowienia szeregiem pętelek łączących, od podkładu aż po przypon końcowy (rysunek A), zaoszczędzicie nie tylko cenny czas, ale także nie będziecie się niepotrzebnie denerwować. Dobrze wykonana pętelka jest bowiem znacznie pewniejszym połączeniem od węzła, zwłaszcza gdy wiąże się go w pośpiechu, zgrabiałymi z zimna palcami i na dodatek stoi się na środku rzeki ciągle uważając na prąd wody. Dzięki pętelkowemu połączeniu podkładu (backingu) ze sznurem muchowym, późniejsza wymiana sznura lub zdjęcie go z kołowrotka są znacznie łatwiejsze. Poza tym, na przykład po łowieniu w słonej morskiej wodzie, przemycie sznura i podkładu jest znacznie łatwiejsze. Pętelka na końcu podkładu (do połączenia z linką) musi być jednak na tyle duża, aby bez trudu przechodził przez nią cały kołowrotek muchowy. Najbardziej praktyczna okazuje się tu pętelka zwana bimini-twist (rysunek B).
 Bimini-twist
Do wykonania tej pętelki potrzeba trochę wprawy. Na marginesie dodam, że znacznie łatwiej wiąże się ją na plecionce niż na żyłce monolitycznej. Żyłka nie jest więc zbyt dobrym podkładem. Koniec podkładu składamy na pół na odcinku około 60 cm. Następnie trzymamy koniec podkładu razem z podkładem biegnącym do kołowrotka, drugą natomiast ręką chwytamy za powstałą pętelkę i skręcamy ją około dwudziestu razy wokół własnej osi (1). Końcową pętelkę zaczepiamy o kolano i utrzymując ją w rozwarciu ścieśniamy skręcony wokół siebie podkład rozciągając go na boki (2). Trzymając całość w napięciu przyciskamy dodatkowo palcem wskazującym skręcony podkład od wewnątrz pętelki. Ważne: ręka, której palec wskazujący od dołu naciska na skręcony podkład, musi w tym samym czasie trzymać także wolny koniec podkładu.
Efekt skręcania
Efekt: podczas naciskania okręcamy w tym samym czasie podkład drugą warstwą wokół pierwszego skręcenia (3). Trzymając w rękach to podwójne skręcenie wykonujemy prosty węzeł zaciskowy wokół jednego z dwóch rozgałęzień tworzących pętelkę i całość zaciągamy (4, 5). Następnie wykańczamy węzeł pętelki wykonując trzy owinięcia wokół podstawy pętelki i zaciskamy koniec podkładu (6, 7, 8). Teraz potrzebna nam będzie pętelka na końcu sznura muchowego. Aby właśnie wykonana pętelka na końcu podkładu mogła przejść przez pętelkę na początku sznura muchowego, ta ostatnia musi mieć przynajmniej od 5 do 10 mm. Do wykonania małej pętelki na początku linki muchowej idealnie nadaje się podwójny węzeł omotkowy (wykańczany igłą). Opływowy kształt tego węzła jest bardzo dużą zaletą podczas holu (rysunek C).
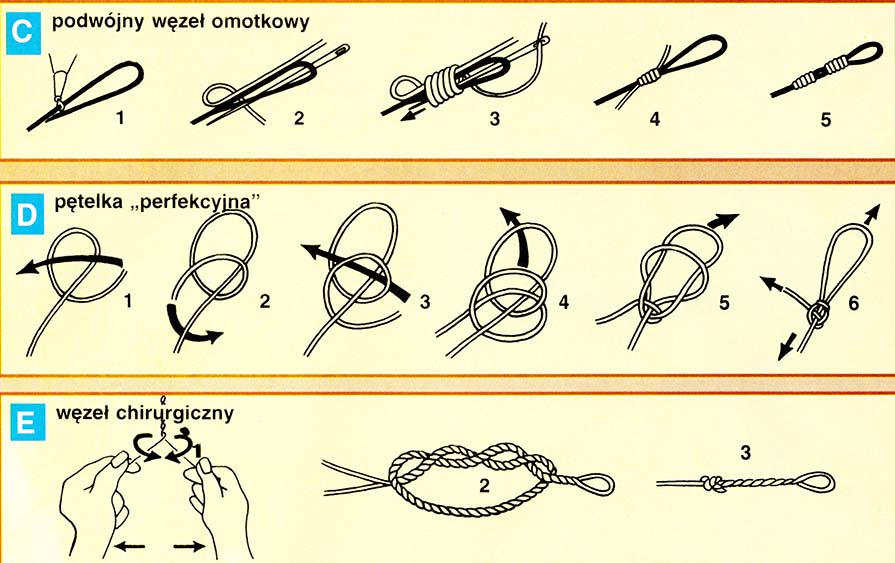 Węzeł omotkowy
Robimy na końcu linki muchowej małą pętelkę przyklejając do niej skośnie ścięte zakończenie linki klejem błyskawicznym (1). Następnie wykonujemy z żyłki 0,25-0,30 mm dwa węzły omotkowe, każdy po siedem, osiem zwojów wokół pętelki (2, 3, 4). Musimy przy tym zwrócić uwagę, aby pierwszy węzeł omotkowy w całości przykrył miejsce sklejenia sznura muchowego.
Węzeł ten zaciągamy bardzo mocno, aby żyłka pewnie zacisnęła się na miękkiej powierzchni sznura muchowego (5).
Jeżeli ktoś chce, może dodatkowo zabezpieczyć węzeł omotkowy cienką warstwą kleju neoprenowego lub PCW. Kleje te, w przeciwieństwie do innych, są rozciągliwe także po wyschnięciu.


